Word: Basics
Introduction to Word
Objectives
General
Students will:
- Be able to navigate through Microsoft Word
- Be able to perform basic text formatting
Specific
Students will:
- Understand how to apply/download/start a new document with a template
- Understand Basic Formatting options
- Understand the Spell Check tool
- Understand the various ways to save and print
- Be able to use the various options for under the Page Layout Tab
- Margins, Columns, Orientation and Align
Outline
- Intro (use your hook)
- Backstage View and Ribbon
- Contextual Tabs
- Templates
- Spell Check
- Basic Formatting
- Font Group
- Spacing
- Line
- Before and After
- Text Align
- Bulleted and Numbered Lists
- Save (video up to minute 2:12) /Printing
- Conclusion
- Recap and Lesson 2 preview (Styles and Advanced formatting)
- Invitation to like the Facebook Page
Hook
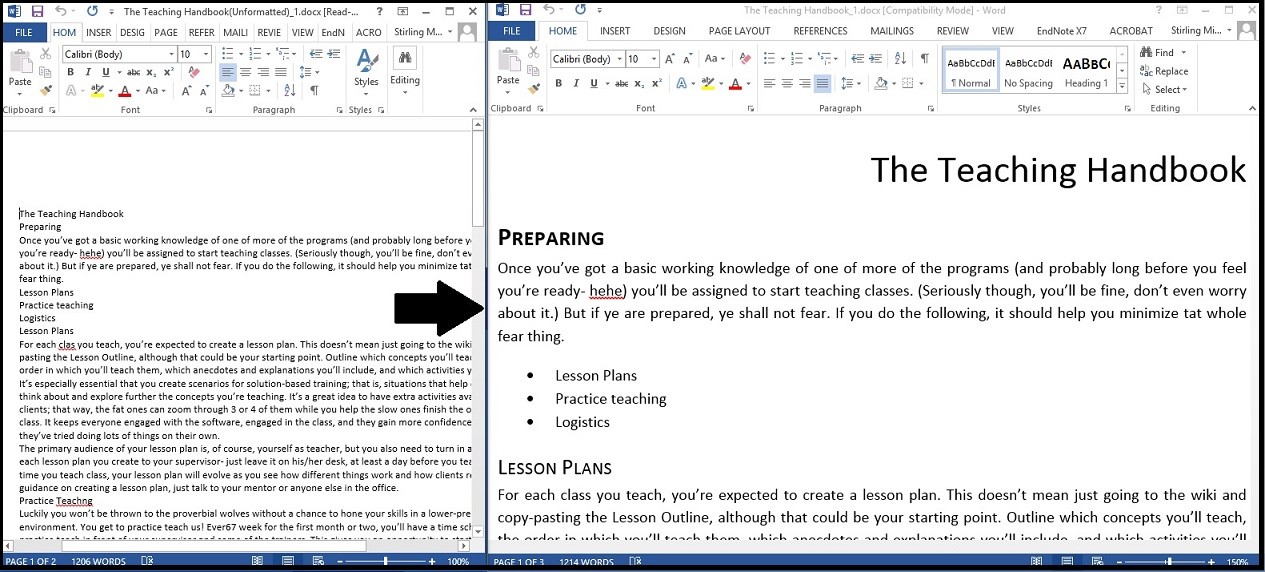
Use both files “The Teaching Handbook(Unformatted).docx” and “The Teaching Handbook_1.docx” to display the transition from the unformatted file to the formatted one. See picture below for reference.
Possible Questions for Understanding
- Layout
- What is the backstage view? How do we get to that view?
- What are contextual tabs?
- Where would I load a template?
- Spell Check
- How do you get to the spellcheck tool?
- What are two things we can do with the spellcheck tool?
- Basic Formatting
- What are two ways to get to local formatting options?
- If I wanted to have a center aligned bulleted list, how would I do that?
- Saving/Printing
- How do we access save/printing options?
- What options does the printing menu give us?
Activity: The Teaching Handbook
The purpose of this activity is not to format the handbook to look exactly like the formatted handbook, but to allow the students to understand how to use local formatting. Let them play around with the fonts and sizes and color and spacing and so forth. DO NOT USE STYLES FOR ANY OF THE FORMATTING!
- Make sure you have them change the size, font, color and bold, italics or underline some of the text.
- Have them add some text to the end to show them the difference between formatting before and after typing the text.
- Add bulleted lists and numbered lists.
- Make sure that you change the style of at least one of the bulleted and numbered lists.
- Change the paragraph spacing
- Add some more appeal to the text by adding some line spacing, before and after.
- How do you get small caps? That’s not a basic option!
- Eject the font group (click on the more options button in the lower right hand corner of the group) and select which effects you want.
The following text is a copy of the old Word Skills day 2 involved with inserting media. Though it is not taught as a class, many of the links may explain uses for Word that you have not otherwise run into.
Objectives:
General
Students will:
- Be able to use the various media insertion options Word provides
- Be able to use the editin tools for different media
Specific
Students will:
- Be able to insert pictures from a file and from online
- Understand available picture editing tools
- Be able to insert Smart Art, Screen Clippings, Tables, Charts, and Links
Outline
- Intro
- Hook
- Insert from file and from online
- Formatting Pictures
- Effects
- Border
- Styles
- Remove Background
- Position
- Text Wrap
- SmartArt & Shapes
- Screenshot and Screen Clippings
- Tables
- Charts (If students ask, here’s how to move charts from excel to word with linking and without)
- Links
- Conclusion
- Invitation to like the Facebook Page
Hook
Use the files BYU at a Glance (example)_1 and (unfinished)_1, this image or your own file to display what you’ll be doing in class today.
Possible Questions For Understanding
- Inserting Pictures
- How do we insert pictures?
- How can we search clip art and online pictures?
- Smart Art
- What is the menu that pops off to the left of a smart art graphic?
- How to we insert individual elements into a smart art graphic?
- Screen Shot
- Can all windows, minimized or otherwise, show up in the Available Windows menu?
- Screen Clippings
- What’s the different between a Screen Clipping and a Screen shot when done in Word?
- Shapes
- How can you change the position of shapes so that one looks like its on top of the other?
- Charts
- How do you edit the data that applies to a chart that you’ve inserted with Word?
- Links
- How do you insert links?
Brigham Young University at a Glance Activity
This activity is largely up to you. The images are provided so feel free to figure out what is the best way for you to teach the required information.
You work for the BYU Alumni Association and are in charge of public relations especially for alumni. Many alumni haven’t been to BYU for years and want to see some of the newer building on campus. They want to see what the website homepage looks like and some information about what BYU is doing right now.- Images
- File
- Online
- Smart Art
- Screen Shot/Clippings
- Shapes
- Tables
- Charts
- Links


