InDesign Day 2 of 5
Pages, document layout, styles
Screencast (feel free to share this with students if they miss this day):
The activity for this class is the new textbook chapter activity. The class files are on the Google Drive. (or files.learnsoftware.org/indesign/)
Example Textbook (part 1 is today; we will finish the textbook on day 3)
Objectives:
- Intro/hook
- Re-linking images
- Inserting, deleting, moving pages
- Autoflow
- Master pages
Lesson outline:
- Re-link cover photo
- Pages
- Insert, delete, move pages
- Autoflow
- 3 ways
- Columns, split and span
- Master pages basics
- Editing, creating new, applying to pages in document
- Review of inserting graphics, text wrap
- Review of save and export
Sample Lesson Plan:
Day 2: (10 pg textbook activity part 1)
Intro
- Student files: tiny.cc/IDday2
- Did anyone use InDesign since last class? What for? How did it go?
- Does anyone have new questions they want to ask or want us to be sure to cover?
- Have students open textbook ID file and download the Columbia text, plus a few images
Links review
- Observe how even on overprint preview the cover image is blurry. That’s because the link is broken.
- Make sure the cover image has been downloaded
- Go into links panel, double click on error symbol, navigate to downloaded image. This will fix the link.
Managing pages
- Insert, delete, move pages
- Pages panel
- New page button to add single page
- Right click > insert pages to insert multiples
- Trash button to delete selected pages
- Right click > move pages to move selected to another position or even to another document
- Or click and drag
Autoflow and threading
- Have them flow the body text through their document using one of the following techniques:
- Threading frames
- Click the port in or port out button in a selected text frame. Click a second frame to add it to the thread. Do this before adding text. Now when you add text it flows to the next frame you designated instead of stopping at the end of the first one you placed it in.
- 3 ways to flow unconnected frames:
- Semi-autoflow: hold down Alt (PC) or Option (Mac) and click. This keeps your cursor loaded but you must click each frame.
- Shift-click for full autoflow. Adds pages and frames until all text is in your document
- Fixed-page autoflow: Shift-Alt-click (PC) or Shift-Option-click (Mac). Adds frames but won’t add more pages.
Columns
- Instead of creating columns in the document and using separate text frames in each like with the newspaper, you can create columns within a single text frame
- Select a text frame and in the contextual menu, find the columns button (top right of paragraph text editing options, usually). Add columns.
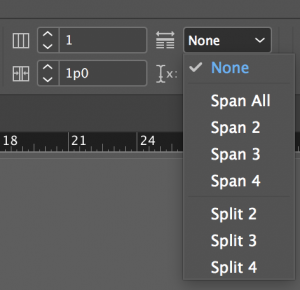
- Note that you can select a specific paragraph and have it span across all columns (good for titles) or split into more columns than the rest of the text (good for lists). These options are right next to the adding columns options in the menu:
Master pages basics
- Creating, applying master pages
- Have students put lines along the top and bottom margins (review or teach line tool here)
- Have them apply that master style to all pages except the chapter title page
- Some design tips: Make use of the master pages to get consistency and unity in your document.
- Overriding master page items
- CTRL-Shift or CMD-Shift and click, or click and drag to select multiples
- Change the color of the line on the first two pages where the table of contents will go
- Page numbering
- On master page: type > insert special character > markers > current page number
- You need to create a text box first
- Have students go through and add layout stuff, adjust the lines, page numbers, shortened textbook title in the margin, etc. Then have them share their design with their neighbors and give feedback.
Review of inserting images
- Have students insert images, apply text wrap, etc. until the end of class.
Review saving and exporting
- They don’t need to save this because we’ll have a partially completed file to start with for day 3. But if they want to save it and keep working on the same file, they’re more than welcome to!
Discuss (5 min)
- Ask students to share what challenges they had and which tools they learned today that they think will be most useful for them in future projects

