DSLR Basics: Day 2
Preparation
- Reserve SL1/SL2 camera(s) for you and any students who need.
- Reserve the studio for class time during Day 2 (reserve two 30 minute slots so you don’t have to check in and no one can reserve the studio while you’re in there)
- Email students the week before class, reminding them to bring their DSLR’s, or check one out from the equipment room (provide instructions and link to online reservation). They can also choose to use a camera we will provide during the class. For the purpose of this class, cameras can be borrowed from the Experiential Zone Help Desk. They are not our usual SL1s or SL2s so you should get a feel for them when prepping for class, and make sure you know how to adjust settings! Cameras should be “checked out” at the beginning of class using the following form. And should be returned at the end of each class. They should not be taken home! It is your job to print this form and bring it to class, and make sure each camera is returned at the end of class.
Objectives
This is the link to the Google Slides presentation.
By the end of the class, students will be able to:
- Become familiar with color temperature and white balance
- Warm vs. cool
- Changing white balance
- Learn basic lighting technique Sunny vs. overcast
- Natural vs. artificial
- Practice in the production studio
- Learn how to change and modify lenses
- Switching lenses without letting dust in
- Modifying the lens with an ND filter
- Full frame vs. cropped
- Introduce basic filming
- Best settings for shutter speed, frame rate
- Now what?
- File management, external hard drives
- Post-processing
- Take our Photoshop and Lightroom classes!
White Balance
The first part of this class will be in the classroom (25 min), and the rest will be in the production studio (5 min to transition, 20 min in the studio).
- Show warm vs. cool photos
- White balance / color temperature
- Walk through the symbols in the camera (sun, shade, etc)
- Talk about photographing in weather (Overcast > Sunny)
Lighting
- If you’re indoors, shoot by the windows
- Outdoors, look for shade
- Watch out for harsh shadows
- Golden hour! (sunset and sunrise are the best times to shoot)
- Natural vs. artificial
- Modify light with reflectors/flash
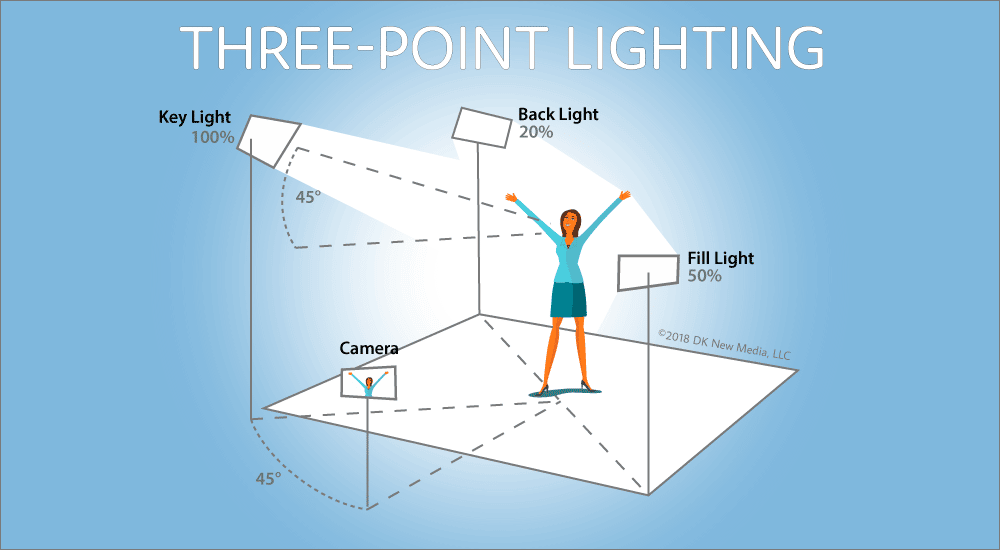
- For filming, 3-point lighting (key, fill, hair/back/rim)

Lenses
- Different lenses give you different focal lengths, apertures, angles
- When changing a lens, match up the dots and lock in place
- Beware of dust getting into your sensor
- Practice changing lenses
- You can modify your lens with filters (explain ND [neutral density] filters)
- Make sure your lens is compatible with your camera
- Full frame vs. cropped (show them this video)
Production Studio
- Intro to the production studio, how to reserve online (bring cards with the URL)
- Have students set up 3-point lighting
- Get a volunteer to model
- show them how the light changes on the person’s face as you move the key light
- bring out the reflector or the V-flat and have someone hold it to reflect the light into the subject’s face
- set up the lightbox and put something inside for them to practice shooting
Video
- Switch your camera to Video mode (or to Live View)
- When filming, you have less leeway with how you change your exposure
- Generally, your shutter speed is fixed. The denominator should be double your frame rate (24 fps = 1/50. 30 fps = 1/60 s. 60 fps for slow motion = 1/120 s)
- So how do you change your exposure? Aperture. ND filters. ISO/Gain.
Now what?
- Practice makes perfect. Go out and shoot!
- Briefly talk about file management (recommend external hard drives for students or people on-the-go)
- Always back up your files after a shoot (box.byu.edu)
- Have a good file/folder organization system
- You will need to post-process RAW photos
- Take our Photoshop/Lightroom classes to learn about editing!
